The AuAlign program
Realign audio and video tracks of an AVI file even in the most problematic cases
Version française ici
Table
Realign audio and video tracks of an AVI file even in the most problematic cases
Version française ici
Table
| Download
AuAlign (executable, sources and JavaDoc) |
 The AuAlign program with code source is at your disposal under
a Creative Commons
Contract.
The AuAlign program with code source is at your disposal under
a Creative Commons
Contract. |
AuAlign is designed to help realign the audio and video tracks of an AVI file
In fact rather often the compressed AVI files present a sound track that is not properly aligned with the video track. In some cases the displacing can attain several seconds, even tens of seconds. The delay is not always uniform, so in some cases you must cut the film into several pieces to get the proper alignment.
More precisely the origin of the displacement may be multiple (see for example here) and of course the solution should be adapted to what caused the displacement.
However I often experience varying displacement in my DIVX AVI encoding due to bad source MPEG2 TV recording: some images have been lost during the recording and the DIVX encoding suddenly gets its sound and video tracks out of sync. I coded this AuAlign program to help me resync the tracks in these cases where neither a single VirtualDub>Audio>Interleaving>Audio skew correction nor a VirtualDub>Video>Frame rate>Change so video and audio durations match are sufficient.
AuAlign generates a JOBS file for VirtualDub with the parameters
needed to fragment the film and align the tracks.
This JOBS file instructs VirtualDub to correct the displacement of each fragment and to reassemble the parts.
This JOBS file instructs VirtualDub to correct the displacement of each fragment and to reassemble the parts.
The original idea of AuAlign
A first idea to operate the correction is to use an AVS file for Avisynth: in fact, an AVS file like
film=AviSource("Mes videos\monFilm.avi")
f0=film.delayAudio(0.0).trim(0, 9884)
f1=film.delayAudio(-0.2).trim(9884, 64386)
f2=film.delayAudio(1.7).trim(64386, 93164)
f3=film.delayAudio(1.3).trim(93164, 99023)
AlignedSplice(f0, f1, f2, f3)
f0=film.delayAudio(0.0).trim(0, 9884)
f1=film.delayAudio(-0.2).trim(9884, 64386)
f2=film.delayAudio(1.7).trim(64386, 93164)
f3=film.delayAudio(1.3).trim(93164, 99023)
AlignedSplice(f0, f1, f2, f3)
will correct most of the alignment problem.
It's of course possible to construct the AVS file line by line: you pass the AVS file under construction to VirtualDub, then you estimate one after one the indices of the frames where the delay needs to be corrected.
However, doing this at hand has two serious drawbacks
- alternating between the edition of the AVS file and the visioning of the film is annoying, specially
because when re-executing VirtualDub with the modified AVS file you must return to the last edited frame
index
- using Avisynth as a video server when the AVS file is finished obliges you to recompress the film,
which is very long and implies a loss of quality.
The AuAlign solution
AuAlign settles these two problems in the following manner
AuAlign makes immediate the alternance between edition and visioning
AuAlign generates - from the AVS file - a JOBS file for VirtualDub that lets VirtualDub cut, correct and reassemble the film, all by 'direct stream copy'.
As a consequence the work is easier, there are no incoherences in the edited file, the final film is output
fast and without loss of quality. Finaly Avisynth servs only when visioning the film to estimate the delay of the soundtrack in the different film
sections, not when processing the output.
AuAlign generates - from the AVS file - a JOBS file for VirtualDub that lets VirtualDub cut, correct and reassemble the film, all by 'direct stream copy'.
.
Here is how to use AuAlign
Notes :
AuAlign is written in Java 5. To execute the program you need a Java Runtime Environment version 5.0 or superior.
AuAlign uses Avisynth and VitualDub. You must have these two installed on your machine before beginning the work.
AuAlign is a JAR file. To execute it, use the command
AuAlign uses Avisynth and VitualDub. You must have these two installed on your machine before beginning the work.
AuAlign is a JAR file. To execute it, use the command
java -jar AuAlign.jar
(If your installation is conveniently configured you may also doubleclick the JAR file).
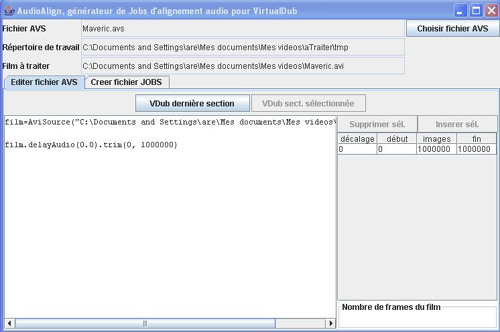
Interface
AuAlign presents this interface

Description
- The upper part lets you select and control
the AVS file to edit
the working directory for the generated files
the film to be traited
the working directory for the generated files
the film to be traited
- the lower part presents two tabs. The first one, visible on the image, is used for the edition of
the AVS file. It presents
two buttons used to launch VirtualDub
the window left is used to show the AVS file under construction
the right part is used to edit the file
the window left is used to show the AVS file under construction
the right part is used to edit the file
The second tab lets you 1) see the generated JOBS file, 2) generate and save this JOBS file to the harddisc
and 3) execute VirtualDub with this file in order to generate the final film.
To start, click the button up right Choisir fichier AVS (=choose AVS file) The directory choosen for the AVS file will be used as the working directory for AuAlign.
If the name of the AVS file doesn't exist, it's probably because your intention is to begin a new project

In this case you are invited to select the film to correct. When that is done the program presents as follows, and you are ready to work.
Click VDub dernière section (=VDub last section). The program trys to execute the command
VirtualDub AuAlign_editsection.avs
where AuAlign_editsection.avs is a temporary file. In order to succeed VirtualDub must be accessible by AuAlign. If this is not the case, AuAlign will ask you where to find VirtualDub. This information will be stored for subsequent use by AuAlign.
When VirtualDub opens, explore the film with the cursor and note the first frame where the sound track is enough delayed to need a correction. It's best to cut the fil at a keyframe, so use the "search keyframe left" button of VirtualDub. Still better, cut the film at a scene-shift. Write the index of this frame in the right part of AuAlign, in the cell of the column labeled frames (double-clic the cell to edit). Press then 'enter' on your keyboar; a new line appears and the first representes now the first section of the future corrected film.
This first time you should also note the total number of frames of the entire film, and enter this number in Indice dernière frame du film (=index of last frame) in the lower right corner of AuAlign (this should be done once).
Click anew VDub dernière section. VirtualDub will then show only the part of the film remaining to be corrected, the continuing of the treatment thus beeing immediate.
This time try to estimate the delay interval of the soundtrack. Edit the interval in milliseconds in the cell décalage (=delay) of the current section. A positive number will defer the sound, a negative number will advance the sound. Reexecute VDub dernière section and listen to the result. Finetune until you are satisfied. Then move farther on in the film to find the next index where the drift needs an other interval value for correction, and enter the corresponding index in the frames column of the current section.
If the soundtrack is delayed from the start of the film you can of course modify the delay value of the very first section.
Continue until the end of the film.

Variants of the base scenario
At any moment you can
- select a section (= a line) in the table of sections and reexecute it with VirtualDub (button
VDub sect. sélectionnée)
- modify the beginning (=début), the number of frames or the end (=fin) of a section
- insert a new empty section (it will be inserted after the selected section)
- delete the selected section (it will be concatenated with the preceeding section)
Generation of the JOBS file
When you have finished the edition of the AVS file, go to the second tab Créer fichier JOBS (=create JOBS file). You will see three buttons.

Note that the aligned film is stored in the working directory and is named Xxx-out.avi if the original one was Xxx.avi.
Take a try?....
Contact
I'm sorry, the contact sheet is no longer available.
Site updated 08 May, 2017 Remarks and questions? areusite at free dot fr